How to Permanently Delete Files from Computer: Windows & Mac

If you’re like most people, you use your computer to store all sorts of files – from important work documents to treasured family photos.
But did you know that even if you delete those files, they can still be recovered by someone with the right knowledge and tools? That’s why it’s important to know how to permanently delete files from your computer.
In this article, we’ll show you ‘how to permanently delete files from computer‘, on both Windows and Mac.
How to Permanently Delete Files from a Computer: Windows
Locate the files you want to delete
Find the files you want to delete before you can delete a file permanently, you need to know where it is. You can find files by opening the File Explorer, which is usually found on the taskbar at the bottom of your screen.
Click on the File Explorer icon to open it, then navigate to the folder where the files you want to delete are located.
Delete the files
To delete a file permanently, you need to use a special command called “Shift + Delete”. This command bypasses the Recycle Bin, which is where deleted files are normally stored until you empty it.
To use this command, simply select the file or files you want to delete, then press the Shift key on your keyboard and hold it down while you press the Delete key. A confirmation dialog box will appear asking if you’re sure you want to permanently delete the file. Click “Yes” to confirm.
Overwrite the deleted files
Overwrite the deleted files even after you use the “Shift + Delete” command, the files you deleted may still be recoverable. That’s because the data is still physically stored on your computer’s hard drive, even though the file is no longer visible.
To truly delete the file, you need to overwrite the data with random characters or patterns. Fortunately, there are many free tools available that can do this for you, such as CCleaner or Eraser. Simply download and install one of these tools, then follow the instructions to overwrite the deleted files.
Step-by-Step Guide on how to Permanently Delete Files from a Windows Computer:
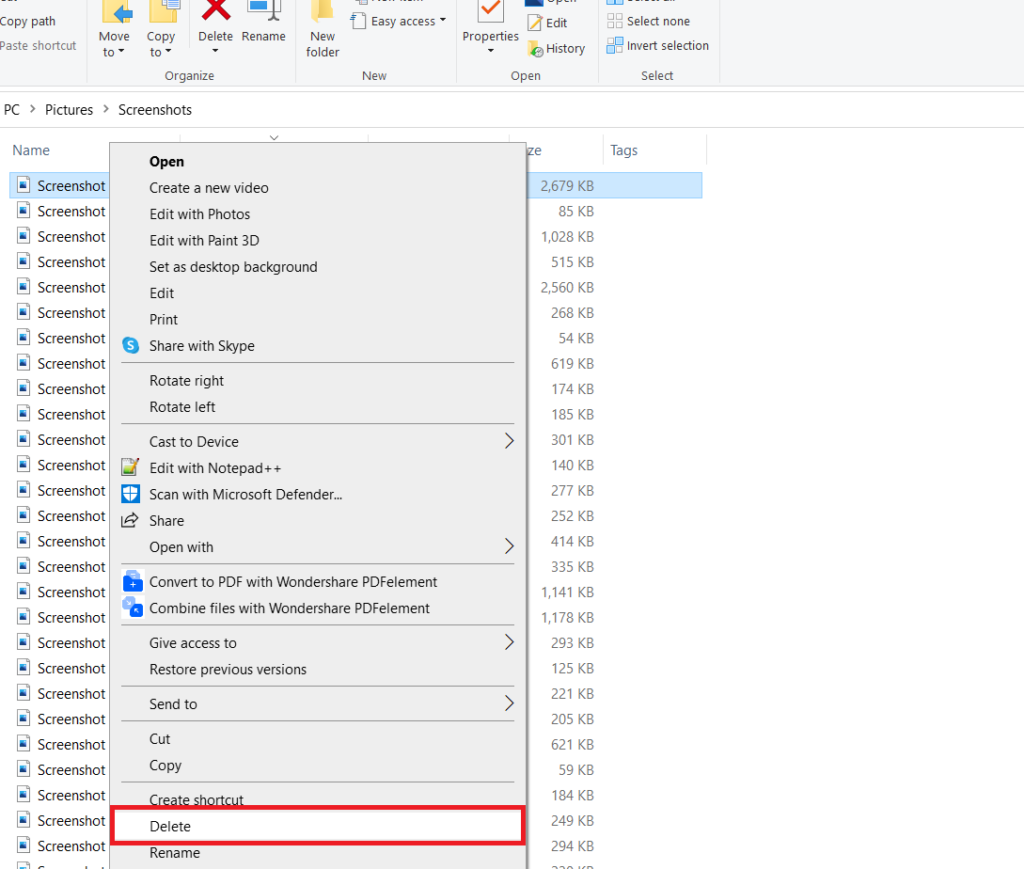
- Select the file or folder you want to permanently delete. You can do this by left-clicking on the file or folder to highlight it.
- Once you have selected the file or folder, right-click it and choose “Delete” from the drop-down menu. Alternatively, you can also press the “Delete” key on your keyboard.
- A confirmation dialog box will appear asking you if you’re sure you want to permanently delete the file. Click “Yes” to proceed.
- Now, go to your desktop and right-click the Recycle Bin icon. Select “Empty Recycle Bin” from the drop-down menu to permanently delete the file.
- To ensure that the file is permanently deleted, you can overwrite the space on your hard drive where the file was stored. One way to do this is by using a third-party software like CCleaner. Alternatively, you can use the built-in Windows tool called “Disk Cleanup” to clean up your hard drive.
- Press the Windows key + E together to open your File Explorer. If File Explorer is pinned to your taskbar, you can go to the bottom of your screen and click the File Explorer icon.
- In File Explorer, navigate to the folder that used to contain the file you just deleted.
- Once you have located the folder, right-click it and select “Properties” from the drop-down menu.
- In the Properties window, click the “Disk Cleanup” button to clean up your hard drive.
- In the Disk Cleanup dialog box, select the drive that you want to clean up and click “OK”.
- Windows will then scan your hard drive for unnecessary files that can be deleted. Once the scan is complete, you can select the files you want to delete and click “OK” to proceed.
- Windows will then delete the selected files and free up space on your hard drive. This will also overwrite the space where the deleted file was stored, making it difficult or impossible to recover.
How to Permanently Delete Files from Computer: Mac Devices
Find the files on your mac device
Find the files you want to delete as with Windows computers, the first step to permanently deleting files from a Mac is to locate the files you want to delete. You can do this by opening the Finder, which is the Mac equivalent of the File Explorer. Click on the Finder icon on your Dock, then navigate to the folder where the files you want to delete are located.
Delete the files
To delete a file permanently on a Mac, you need to use the “Option + Command + Delete” command. This command works similarly to the “Shift + Delete” command on Windows computers. Select the file or files you want to delete, then press and hold the “Option” and “Command” keys on your keyboard while you press the Delete key. A dialog box will appear asking if you’re sure you want to permanently delete the file. Click “Delete” to confirm.
Empty the Trash
Securely empty the Trash Unlike Windows computers, Macs have a Trash feature where deleted files are stored until you empty it. But even after you empty the Trash, the files you deleted may still be recoverable.
To ensure they are permanently deleted, you need to securely empty the Trash. To do this, simply right-click on the Trash icon in your Dock, then select “Secure Empty Trash” from the menu that appears. This will overwrite the deleted files with random data, making them unrecoverable.
Step-by-Step Guide on how to Permanently Delete Files from a Mac Computer:
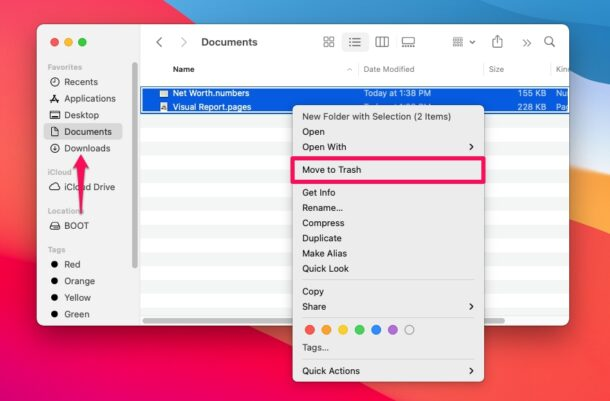
- Select the file or folder you want to permanently delete. You can do this by left-clicking on the file or folder to highlight it.
- Once you have selected the file or folder, right-click it and choose “Move to Trash” from the drop-down menu. Alternatively, you can also drag the file or folder to the Trash icon in your Dock.
- Open the Trash by clicking on its icon in the Dock.
- Once you’re in the Trash, select the file or folder you want to permanently delete.
- With the file or folder selected, click “File” in the menu bar at the top of your screen.
- From the drop-down menu, select “Secure Empty Trash”.
- A confirmation dialog box will appear asking you if you’re sure you want to permanently delete the file. Click “OK” to proceed.
- Mac will then overwrite the space where the deleted file was stored, making it difficult or impossible to recover.
Overall, following these steps will ensure that your files are permanently deleted from your computer and cannot be recovered by others.
By following the steps outlined in this article, you can ensure that the files you delete from your computer are truly gone for good. Whether you’re using a Windows or Mac computer, it’s important to take the extra step of permanently deleting files if you want to ensure that they can’t be recovered by others.
Keep in mind that permanently deleting files means they will be gone forever, so make sure you really want to delete them before you do so.
In addition to permanently deleting files, there are other steps you can take to protect your privacy and security when using a computer.
For example, you can use a virtual private network (VPN) to encrypt your internet traffic and protect your online activity from prying eyes. You can also use anti-virus software to protect your computer from malware and other threats.
Overall, the key takeaway is that simply deleting files from your computer is not enough to ensure they can’t be recovered.
By using the “Shift + Delete” command on Windows or the “Option + Command + Delete” command on Mac, and then securely overwriting the data, you can make sure that the files are gone for good.
You may also like